
Getting your PC back in good shape doesn’t have to take all day. With just a few quick steps, you can make your PC run just like the day you got it.
5
Revisit Your Allowed Startup Apps List
When you install a new app, it usually adds itself to the startup list, meaning it automatically launches every time you restart your computer and sits in your system tray. While a few essential work apps starting automatically makes sense, most programs don’t need this privilege. Since startup apps can significantly affect your system’s performance, it’s a good idea to remove any unnecessary ones from the list.

To remove a startup app, right-click the Start button and choose Task Manager. In the left pane, go to the Startup apps tab. Then, click the Status column to sort the apps by whether they are enabled or disabled. Check the Startup impact column to identify apps with high or moderate impact and disable them. Also, remove anything that is not part of your work stack.
4
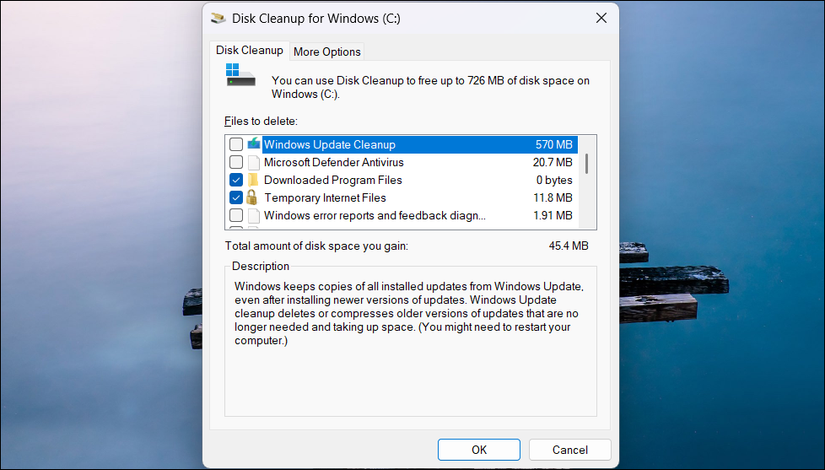
Run Disk Cleanup to Remove Junk
Windows need at least 15% of free space (depending on the storage capacity) on the installation drive to function efficiently. If your disk is nearly full, start with the built-in Disk Cleanup tool to remove old Windows updates, antivirus definitions, temporary internet files, and items in the Recycle Bin. Also, consider setting up Storage Sense to automate the cleanup process.
If you still need more space after cleanup, use TreeSize to visualize what’s actually consuming your storage and identify larger files to remove.
3
Look Into Your Power Settings
Windows offers three power modes: Balanced, Best performance, and Best power efficiency. On a laptop, Windows typically uses the Balanced mode when plugged in and Best power efficiency when running on battery. While these defaults help limit power consumption and extend battery life, they can also affect system performance by throttling CPU speed.
To review your power settings, go to Start > Settings > System > Power & battery. Expand the Power mode section. From the Plugged in drop-down menu, select Best performance. Repeat the same for the On battery option if you don’t want Windows to throttle system performance while on battery power.

Next, review your Energy Saver settings. You can configure Energy Saver to activate when your battery reaches a specific percentage. By default, it turns on at 30% and reduces performance to conserve power. Lowering this threshold to 20% or even 10% can help maintain full performance longer before the system starts throttling to save battery.
2
Manage Your Browser Tabs Better
Tab hoarding refers to the habit of keeping multiple tabs open out of fear of losing access to important information. My work involves extensive research, and I frequently discover interesting articles and opportunities I want to read later. As such, I’m guilty of hoarding tabs all the time.
Over time, it’s easy to accumulate tabs without actively deciding to close them. The result can be a cluttered mess that hurts productivity and defeats the purpose of using tabs. Additionally, browser tabs use a good chunk of memory. So, if you don’t manage them actively, they can slow down your computer and affect the performance of other apps.
Our guide to tab management in Google Chrome offers some great tips, but here’s what has worked for me. I use Session Buddy to save open tabs as a collection that I can restore later. Microsoft Edge’s Collections used to offer similar functionality, but it no longer lets you add all open tabs to a collection.

Another useful tip is to set a tab limit. I try to keep it below 10 at any given time. Reviewing open tabs at the end of each session and closing those you no longer need also helps.
I also use the Sticky Notes app to quickly jot down notes and links I want to revisit later in the day. This helps me stay focused on the task at hand, worry less about losing useful tabs, and free up valuable system memory for other apps.
1
Your Device’s Hardware Still Matters
The two easiest-to-replace hardware components in your system are often the main reason your system lags. If you’re still using a conventional HDD as your primary or even secondary storage, upgrading to an NVMe or SATA SSD can significantly improve speed and reduce high disk usage issues.

Related
6 Reasons You Should Store Your Games on an SSD
You’ll be surprised by how much using an SSD can improve your gaming experience.
Likewise, 16GB of RAM is the standard for modern desktops and laptops (even Apple offers 16GB as standard on its MacBooks now). It provides enough headroom for multitasking, even if your primary use is web browsing with many tabs open. Adding an extra 8GB RAM module is a cost-effective upgrade that can deliver noticeable performance gains.
Upgrading your storage and memory can be as simple as removing the back panel and inserting the NVMe drive and RAM into their respective slots. In fact, the hardest part might just be keeping track of all those tiny screws holding the panel in place. This isn’t the case for all laptops, though, so check how upgradable your device is with the manufacturer before messing around inside of it.
If your hardware isn’t the bottleneck, these tips will keep your Windows computer running smoothly without lag. Another old but useful tip is, whenever a major Windows version drops, skip the upgrade path and do a clean install instead—it saves you headaches down the road.


Leave a Comment
Your email address will not be published. Required fields are marked *